Meetings
Meetings drive a significant amount of functionality inside Our Cat Herder.
Meetings
To access meetings click the Meetings link in the left hand green menu.
Upcoming/Past Meetings
The meetings page is divided into two tabs, upcoming and past meetings.
Once a meetings end time has passed (based on the current date/time) then it will be automatically moved to the past meetings tab. This means only current meetings are shown in upcoming meetings tab.
Meeting Types
To access meeting types click the Meeting Types button at the bottom of the Meetings page.
Meeting types connect to the following parts of Our Cat Herder:
- Agenda templates
- Action (Action Tracker & Closed Actions)
- Minutes last meeting
- Organisation of Meeting Archive in Documents.
For further details on meeting types click here.
Creating a Meeting
To create a meeting click the New Meeting button at the bottom of the Meetings page.
A modal window will appear and you will need to enter the following information:
-
Meeting Type. Read more about meeting types here.
If you choose "Other" from the drop down this will provide a space to type a new meeting type, which will create a brand new meeting type (appearing in the Meeting Types list) which will be accessible in meeting creation for all future meetings.
-
Meeting Title
Choose something that will allow you to easily identify the meeting in the future. The most common naming convention by other Our Cat Herder customers is to use the type and date of the meeting. E.g. "Board Meeting March 2020".
-
Meeting Location
Add you meeting location so meeting attendees have it for easy reference.
-
Meeting date
- Start Time
- End Time
-
Meeting Chairperson
You can choose any person who is a member on your portal to be the meeting chairperson. This gives you flexibility to have different members chair different meetings and sign off meeting minutes.
-
Meeting Description
You can use this to include additional information and messages to meeting attendees.
You will also have the following two settings (these can be adjusted later):
-
Do not email invite(s)
If you do not tick this checkbox meeting invites will be sent immediately to the selected Meeting Chair and if you add people in the meeting details page they will immediately receive an invitation.
We recommend you check this setting as it gives you more control over notifications being sent.
-
Show "Minutes this Meeting" button only to Meeting Creator, Admin and Meeting Chairperson.
This will stop the "Minutes this Meeting" button on the Meeting Details page from showing to anyone other than the meeting creator, users with the role Admin or the Meeting Chairperson (as selected in this modal).
Once you have added all the information completed then click the Create Meeting button at the bottom of the modal.
The meeting will now show on the Meetings page. If the meeting date is in the future it will show under the "Upcoming Meetings" tab. If the meeting date is in the past it will show under the "Past Meetings" tab.
Click the name of your new meeting to go to the Meeting Details page to start customising your meeting agenda and more.
Meeting Details
The Meeting Details pages is where you can administer the meeting. As an Admin user you will have quite a few options here.
White Buttons
If you are assigned the Admin role the white buttons will show on any meeting you view. Which buttons are accessible changes based the current state of the meeting.
Invite People Button
This may also show as the Add People button.
This button has two states that change based on your choice for the setting "Do not email invite(s)" during meeting setup.
If you have checked " Do not email invite(s)" then you will see Add People. When this button is in the Add People state then email invites to the meeting are not sent. To send invites in this state you either need to:
a. un-check the " Do not email invite(s)" by clicking the Edit Details button. As soon as you save this change email invites will be immediately sent to all meeting invitees.
b. Click the Resend button which.
If " Do not email invite(s)" is unchecked then you will see Invite People. When this button is in the Invite People state then email invites to the meeting are not sent.
To invite members of your portal listed on your Members page click the button. You will be presented with a modal where you can tick a checkbox next to each persons name to invite them to the meeting.
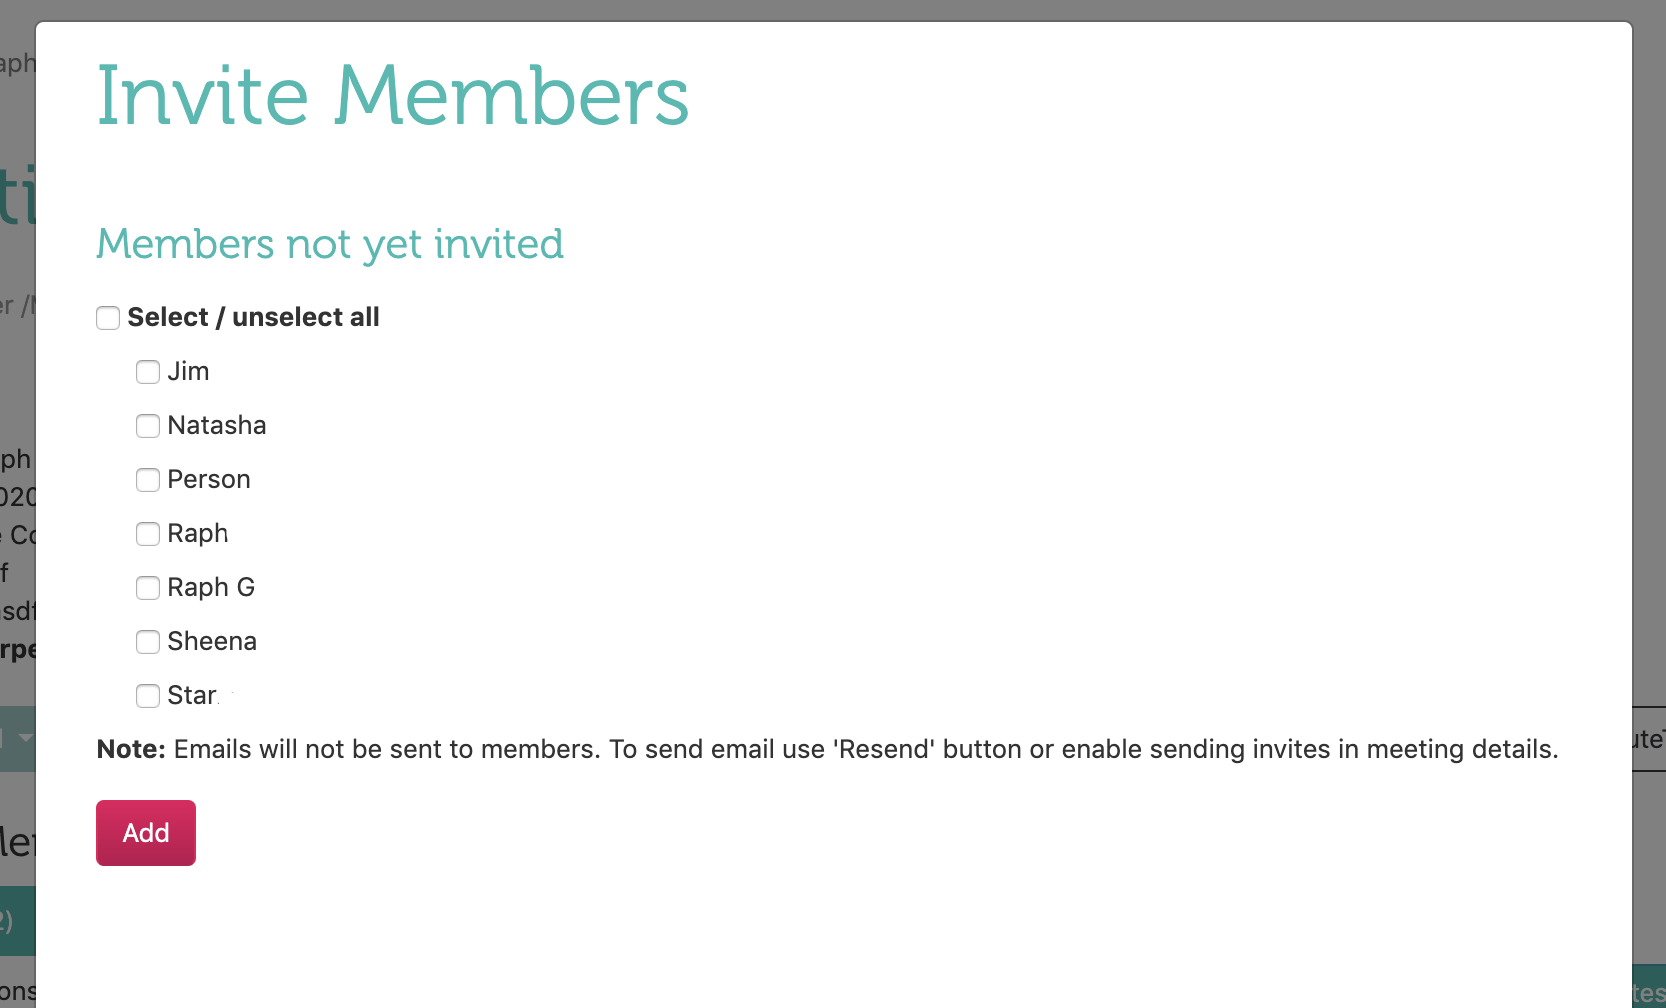
If you have " Do not email invite(s)" is checked then you will see the following note in the modal:
"Note: Emails will not be sent to members. To send email use 'Resend' button or enable sending invites in meeting details."
RSVP Button
The RSVP button will show if you are invited to the meeting via the Invite People or Add People Once you have RSVP'd to the meeting (you can choose Accept or Apology) the button will change to show the response you have input.
As an admin you can modify your own and your members responses under the Invited Members list. Click here for further information.
Resend Button
This button allows you to resend invite to all meeting attendees. Once you click Confirm in the modal invites will be sent.
Edit Details
Clicking the Edit Details button you will give you access to the same information/modal as Create Meeting.
Notifications
If " Do not email invite(s)" is unchecked then every time you click the Save Changes button meeting invitees will get an email notification about the change.
Edit Agenda
The Edit Agenda button provides access to the Agenda builder functionality, which also drives the Minute Taker structures.
Click here for further information on building your meeting Agendas.
Background Paper
The Background Paper button allows you to create background papers directly inside Our Cat Herder.
Click here for further information on creating background papers.
Add Attachment
The Add Attachment button allows you to quickly attach files to your Agenda. Either by uploading from your computer or by allowing you to select documents already stored in your portal's Documents area.
Minute Taker
The Minute Taker button takes you to the minute taking functionality for your meeting. You can also assign actions for this meeting in this area as well.
Please see Minutes for more information.
Green Buttons
The green buttons provide quick access to all documents added to the meeting. With one exception, based on meeting settings, these buttons show to all people invited to the meeting.
Meeting Papers 
Next to the heading "Meeting Papers" you will see a small folder icon. This is a quick link to the Meeting Archive folder for this meeting. Clicking it will take you directly to that folder. Initialy the folder will be empty, however it will populate as you add documents to your meeting. If at any time you can't see a document that show be there, try using the Generate Documents in Minute Taker.
Minutes this Meetings
This button shows the system generated PDF of the meeting minutes which you have input via the Minute Taker.
You cannot replace the system generated PDF with your own PDF or document.
When setting up your meeting you can check the " Show "Minutes this Meeting" button only to Meeting Creator, Admin and Meeting Chairperson." checkbox. This will hide this button from all meeting attendees, except for:
- The Meeting Creator
- Members assigned the "Admin" role
- And the member set as the Meeting Chairperson.
All
This button will download all meeting documents as a .zip file to your local computer. For details on how to open a zip file on your computer or device google ".zip" + the type of device you have.
All as PDF
This button will combine all documents attached to the meeting that are in PDF or Word format into a single meeting PDF.
The order of the documents is not currently customisable.
The order is as follows:
- Meeting Agenda
Agenda
This button shows the system generated PDF of the Meeting Agenda based on the Agenda you construct in the Agenda Builder Edit Agenda.
Minutes Last Meeting
This button shows the system generated PDF of the Minutes PDF from the previous meeting of the same type. This is driven by the Meeting Type selected. And will always show the last meeting on the system. To see the last meeting visit the
Action Tracker
This button shows all actions (marked "Not Yet Started", "On Hold", "In Progress" or "Complete") connected to Meetings with the same Meeting Type as selected when you created the meeting. This allows you to quickly carry actions across meetings of the same type.
Closed Actions
This button shows all actions marked "Closed" connected to Meetings with the same Meeting Type as selected when you created the meeting.
Invited Members
On the middle left of the Meeting Details screen you will see the "Invited Members" which features four vertical tabs:
Each will have a number in brackets next to it. If you have not invited anyone all will show 0 in brackets.
Invited - shows all members invited to the meeting. [is the default selected tab]
No Response - shows all members who have not yet RSVP'd
Accepted - shows all members who have RVSP'd "Accepted"
Apologies - shows all members who have RVSP'd "Apology"
To the right hand side of each member name you will see a small icon. You can click this to modify the member's response if required. The member will also see the same button next to their own name (not others) when they are view the meeting in their account so that they can modify their response if needed.
Meeting Comments
Under the "Invited Members" area there is a comments section which is accessible to everyone invited to the meeting.
By clicking the button next to "Comments" you can add comments to the meeting. When you add a comment a notification is automatically sent to all meeting attendees, no matter their response.
Deleting a Meeting
To delete a whole meeting head to the main Meetings page via the main green menu.
Find the meeting you wish to delete under the Upcoming or Past Meetings tabs.
On the far right of the meeting name under "options" there will be a small trash icon.
Click this icon and a modal will appear asking you to confirm you wish delete the meeting.
Notifications
This action will irreversibly delete all data for that meeting. Use with caution.
Minutes Last Meeting Restricted Access
In some cases your users may create a meeting and get the following notice:
"Your access to last meeting minutes is restricted. Please contact your portal admin to request access."
This is due to Our Cat Herder's Attendance based access to Minutes Last Meeting documentation.
Users with roles such as "Staff" or "Member" (that are quite restricted) have limited access to meeting minutes based on their attendance record. Specifically:
Access Based on Attendance: Users can only view the Minutes Last Meeting if they are listed as being invited to that meeting.
Non-Attendees: If a user has never attended a meeting of the same type, they will encounter a message stating: "Your access to the last meeting minutes is restricted. Please contact your portal administrator to request access."
Partial Attendance: Users who have attended previous meetings but missed the immediate last one may view the minutes from the last meeting they attended, but not from the most recent meeting they missed.
Administrator: As an administrator, you can view the minutes of any meeting. However, other users will only see the minutes from meetings they have attended. If they were absent from the latest meeting, they will see the minutes from the previous meeting they attended.
This structure ensures that access to sensitive information in meeting minutes is controlled and based on direct participation in the meetings.
How to fix "Your access to last meeting minutes is restricted."
To allow a user who encounters this message access to the Minutes Last Meeting document head to the past meeting the "Minutes Last Meeting" are coming from and invite that person as a 'viewer' to that meeting.
Updated: 1 May 2024